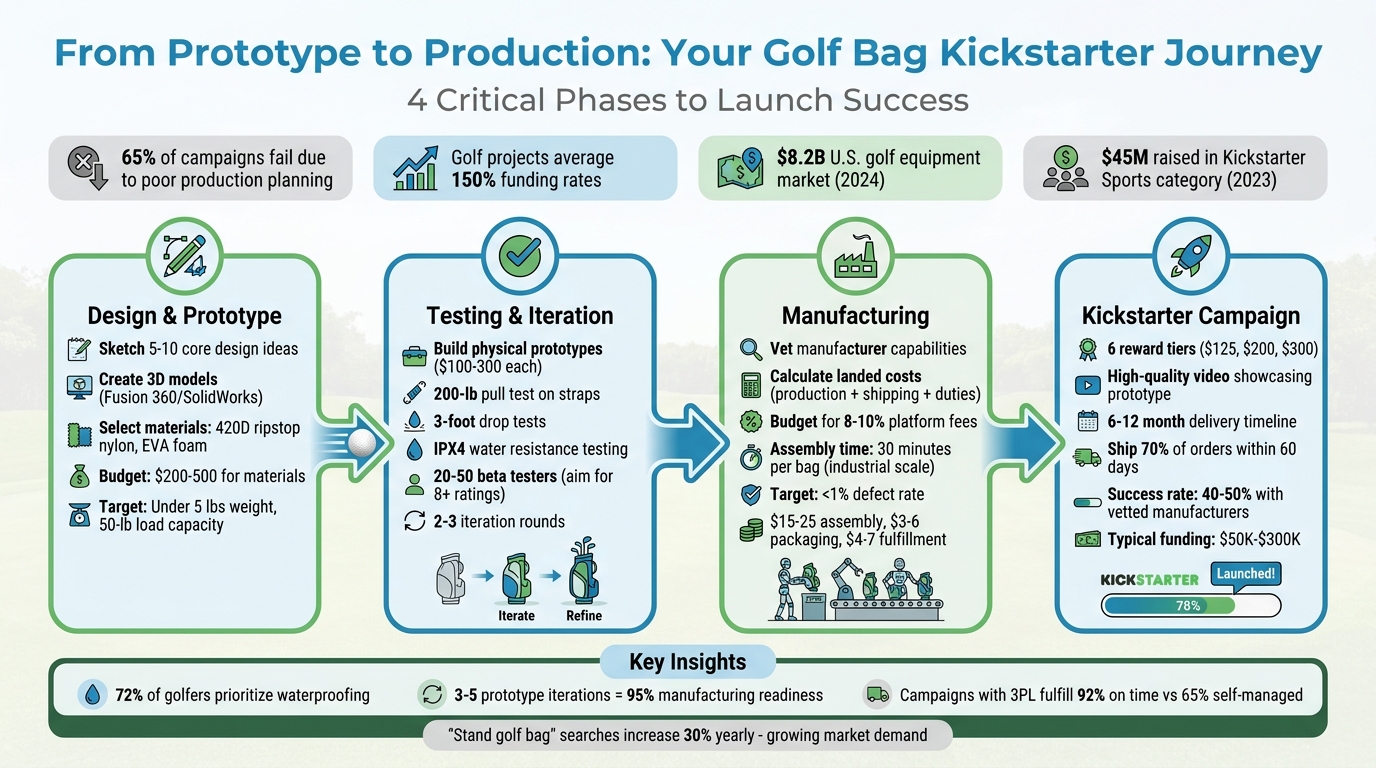
Bringing a golf bag idea to life and launching it on Kickstarter requires careful planning. With 65% of campaigns failing due to poor production planning, success depends on strong prototypes, reliable manufacturing, and an engaging campaign. Golfers are willing to support well-thought-out designs, as seen in 2023 when Kickstarter’s Sports category raised $45 million with golf projects averaging 150% funding rates. The U.S. golf equipment market, valued at $8.2 billion in 2024, shows growing demand for personalized, high-quality gear.
Here’s what you need to know to turn your concept into a funded campaign:
- Design and Prototype: Start with sketches addressing key golfer needs (e.g., waterproofing, lightweight designs). Use CAD tools like Fusion 360 or SolidWorks for 3D modeling and test materials such as 420D ripstop nylon e EVA foam for durability.
- Testing: Build physical prototypes, test durability, and gather feedback from beta testers to refine your design.
- Manufacturing: Vet manufacturers for quality, capacity, and ethical practices. Compare costs, including shipping and platform fees, to manage your budget effectively.
- Kickstarter Campaign: Showcase your prototype with clear visuals, a compelling video, and transparent timelines. Use reward tiers to attract backers and plan for realistic delivery schedules.
Golf Bag Kickstarter Production Process: From Prototype to Campaign Launch
Building Your Golf Bag Prototype
Initial Design and Market Research
Start by sketching designs that tackle real issues golfers face. Focus on 5-10 core ideas that address common pain points like better club organization, improved weight distribution, and easier access to essentials. Highlight standout features in your sketches – maybe modular pockets, ergonomic straps, or lightweight frames.
Next, dive into market research to validate your concepts. Explore successful Kickstarter campaigns by searching "golf bag" on the platform. You’ll find over 50 projects, including Sunday Golf bags, which raised over $500,000 by emphasizing a minimalist design. To gather direct input, survey at least 100 golfers through platforms like Reddit’s r/golf community or Google Forms. Key insights? 72% of golfers prioritize waterproofing, and walkers strongly prefer bags weighing under 5 lbs. Use Google Trends to spot search patterns – terms like "stand golf bag" see a 30% yearly increase, showing strong interest. Additionally, comb through Amazon reviews of highly rated (4+ stars) bags to uncover what golfers love and what disappoints them. These insights will guide your next steps: creating detailed 3D models and selecting materials.
3D Modeling and Choosing Materials
Turn your sketches into precise 3D models using CAD tools. Fusion 360 is a great free option for startups, offering parametric modeling to test things like strap stress points. For more advanced needs, SolidWorks ($4,000/year) provides professional-grade features. Focus on modeling key components: the main body with 10-14 dividers, adjustable 30-50 inch shoulder straps, and a 35-inch rigid base. Keep tolerances tight (around 0.5mm) to reduce iteration cycles by up to 40%.
Material selection is all about balancing durability, weight, and aesthetics. Ripstop nylon at 420D (6-8 oz per square yard) is a solid choice for weather resistance while keeping the bag’s weight under 4 lbs. Add 0.5-inch thick EVA foam padding for comfortable straps and carbon fiber legs for a stand system that weighs just 1.5 lbs. For context, Titleist bags use ballistic nylon rated for five years of durability. Aim for your prototype to handle a 50-lb load capacity while keeping the total weight between 3.5-5 lbs – ideal for golfers who walk the course. Source materials from suppliers like Alibaba or ThomasNet, where ripstop nylon costs about $5 per yard with a 50-yard minimum. Budget $200-500 for your initial materials to create a high-quality prototype.
Building and Testing Physical Prototypes
Once your materials and models are ready, it’s time to build a physical prototype. Use tools like the Brother CS7000X sewing machine (around $150) and the Creality Ender 3 3D printer (about $200) for custom components like buckles and stand parts. Combine these with off-the-shelf hardware from golf retailers to keep costs manageable – expect $100-300 per prototype. Cut fabric patterns, sew the bag’s body, attach hardware, and reinforce seams.
Testing is where your design proves its worth. Start by putting the straps through a 200-lb pull test – they should hold firm with no slippage. Check that the pockets can securely hold 20 clubs without sagging. Ensure the stand deploys in under 2 seconds and remains stable on a 10-degree slope. Test durability with 3-foot drop tests and simulate 50 rounds of use over 10 miles in rainy conditions (aim for IPX4 water resistance). Finally, load the bag with up to 60 lbs to assess real-world performance.
Once testing is complete, share prototypes with 20-50 beta testers, such as members of local golf clubs or Facebook Groups. Use surveys to gather feedback, asking testers to rate comfort and functionality on a 1-10 scale – aim for scores of 8 or higher. Document all feedback in a tool like Notion, including before-and-after photos. If 60% of testers suggest widening pockets, for example, adjust your design accordingly. Plan for 2-3 rounds of iterations based on this feedback. These refined prototypes will serve as crucial evidence of your concept’s viability when you approach manufacturers for production.
sbb-itb-4fa7e8b
Improving Design and Finding Materials
Preparing Design for Manufacturing
Fine-tune your CAD models to include all the specifications needed for production. Use computer-aided cutting machines to ensure patterns are consistent and to reduce material waste. To keep raw fabric edges from fraying, apply binding tape or use heat-sealing techniques. Don’t forget to finalize custom branding elements – like logo placement or embroidery – so they’re seamlessly incorporated during manufacturing.
Sourcing and Testing Materials
Once your design is ready, the next step is finding the right materials for production. Look for suppliers that offer high-quality fabrics and dependable hardware. For the main body of the golf bag, durable nylon or polyester is a solid choice, offering a balance between strength and visual appeal. When it comes to hardware, stick with trusted components like YKK zippers and well-known buckle brands.
Before committing to large orders, make sure to test your materials rigorously. Perform abrasion tests (Martindale), hydrostatic pressure tests, salt spray tests, and mechanical load tests to ensure everything can withstand tough, real-world conditions.
As GolfBagFactories points out, "Investing in high-quality materials may increase initial costs, but it results in golf bags that are more durable, perform better, and maintain their appearance over time, providing better value for both brands and end consumers."
Selecting a Manufacturer
Assessing Manufacturer Capabilities
Finding the right manufacturing partner is key to fulfilling your Kickstarter promises. One of the best ways to ensure consistent quality is to request multiple samples. This helps you determine if the manufacturer maintains high standards or if that first flawless sample was just a lucky one. Additionally, pay attention to how quickly they respond. Delays during this stage might indicate future production hiccups.
Make sure the manufacturer can handle your expected production volume within your delivery timeline. For instance, if your campaign raises $50,000 and you need 500 bags delivered in 90 days, confirm they have the capacity to meet that deadline. If your rewards include multiple tiers with different items, check whether they can manage kitting and bundling everything into single packages for your backers. Don’t overlook verifying their adherence to labor and environmental standards, especially if your target audience includes U.S. consumers who care about ethical production practices.
For example, Manter o golfe perfeito offers a complete range of OEM/ODM services tailored for custom golf bag projects. Their services include design support, sampling, production, inspection, packaging, and global delivery. Working directly with Marvin and his team eliminates middlemen, simplifying communication and reducing costs. This kind of thorough vetting ensures you can meet your campaign promises while staying on schedule.
Once you’ve confirmed a manufacturer’s capabilities, the next step is to evaluate their cost efficiency.
Comparing Manufacturing Options and Costs
When comparing manufacturers, always calculate the landed cost – this includes production, shipping, customs, duties, and taxes. A manufacturer quoting $45 per bag might end up costing $62 per bag after all fees, whereas one quoting $52 might land at $58. These differences can add up quickly, so be thorough in your calculations.
Don’t forget about platform fees and payment processing costs. Kickstarter fees (5%) and payment processing fees (3-5%) will eat up 8-10% of your total funding before production even begins. For example, if you raise $40,000, you’ll actually have around $36,000 to work with. Be sure to budget for unexpected expenses like overruns, defects, or shipping issues. As Red Stag Fulfillment advises, "Never launch a crowdfunding project without a financial buffer. The most successful creators budget for significant cost overruns and celebrate when they come in under budget".
It’s also wise to select a backup manufacturer, even if their costs are slightly higher. This gives you a safety net in case your primary partner encounters delays or quality concerns. For international shipping, work with manufacturers experienced in handling customs documentation. If you’re offering Delivered Duty Paid (DDP) terms, it’s especially important to ensure all duties are covered upfront so your backers aren’t hit with unexpected fees upon delivery.
Moving to Mass Production
Assembly and Adding Branding
Once your manufacturer is secured, the assembly process becomes the cornerstone of fulfilling your Kickstarter campaign. Industrial sewing machines can slash assembly time from 4 hours for prototypes to just 30 minutes in large-scale production. This time-saving shift is essential when scaling up to produce 500–1,000 units per month to meet backer demands.
The assembly process focuses on durability and precision. Reinforced stitching – 8 to 10 stitches per inch – strengthens straps and panels, while metal-tooth zippers add long-lasting functionality. Dividers are secured with rivets for extra stability. Manufacturers often rely on jigs and fixtures to ensure every bag aligns perfectly with your prototype’s design. For branding, embroidery on nylon or leather materials is done with 6–8 needle machines, creating over 5,000 stitches for a polished, durable finish. For polyester bags with bold designs, heat-transfer printing is a practical choice, handling 300–500 units per hour while maintaining consistent colors.
Quality control is a multi-step process. It starts with pre-production samples to confirm your final design specs. During assembly, in-line inspections check 10–20% of units for issues like stitching flaws, zipper functionality, and load capacity. For example, bags are tested by placing 50 lbs in each pocket for 24 hours. To further ensure quality, third-party auditors can certify the process to ISO 9001 standards, helping you achieve defect rates below 1%. This meticulous approach guarantees consistent quality and reassures backers. With assembly and branding complete, the next step is packaging and shipping to deliver your golf bags in perfect condition.
Packaging and Shipping
Packaging plays a dual role: protecting the golf bags during transit and creating a memorable unboxing experience. Double-walled corrugated boxes with a 200 lb test strength are ideal, typically sized around 48×16×16 inches for 14-way bags. To prevent damage, include foam inserts or air pillows for padding and moisture barriers like poly bags. Add branded touches, such as stickers or QR codes linking to care instructions – these small details can reduce damage claims by up to 40%.
Shipping logistics require careful attention to dimensional weight calculations. For carriers like UPS or FedEx, the dimensional weight is calculated by multiplying the box’s length, width, and height, then dividing by 166. For instance, shipping a 50-lb bag in a 4-cubic-foot box costs approximately $50–$80 for domestic ground delivery. Many Kickstarter campaigns rely on third-party logistics (3PL) providers like ShipBob, which specialize in fulfillment and offer 2–5 day shipping across the U.S. Data shows that campaigns using 3PL services fulfill 92% of orders on time, compared to 65% for those managing fulfillment themselves.
When budgeting, plan for $15–25 per bag for assembly and branding, $3–6 per box for custom packaging, and $4–7 per order for 3PL fulfillment. Storage costs typically run about $0.50 per cubic foot each month. It’s also wise to keep a buffer stock of 10–15% above your pledge volume to account for defects or damages. Aim to ship 70% of orders within 60 days of the campaign’s end. Clear communication about shipping timelines can go a long way in keeping backers happy, even if minor delays arise.
Creating Your Kickstarter Campaign
Showcasing Product Features and Manufacturing Quality
Details matter when you’re presenting your product. Highlight every feature – whether it’s a pocket, zipper, strap adjustment, or the materials used – through close-up photos. Show elements like reinforced stitching at stress points, durable metal zippers, and thoughtfully designed divider systems. Including clear specifications, such as weight, dimensions, and fabric denier ratings, reassures backers that you’ve put significant effort into refining your design.
Equally important is being upfront about your manufacturing partner. If your manufacturer has a track record of producing for well-known brands or has successfully delivered Kickstarter projects before, let your audience know. For example, Peak Design’s 2014 Kickstarter campaign for their "Slide" and "Clutch" camera straps raised over $800,000. When a manufacturing defect caused issues, they used transparent video updates to explain the problem and how they fixed it. This honesty earned them strong support and goodwill from backers.
Avoid relying solely on concept visuals. Instead, showcase a physical prototype that’s nearly ready for production. Use real-world settings – like golf courses, car trunks, or fully loaded with clubs – to demonstrate your product’s functionality and reliability. These visuals not only build trust but also set the stage for an engaging campaign video.
Producing Campaign Videos and Visuals
Your campaign video should do more than just introduce your product – it should tell your story. Explain your design journey, share the challenges you faced, and show how you overcame them. Adam Saraceno, Chief Marketing Officer at Peak Design, puts it this way:
"Kickstarter brings us face-to-face with the best customers that you could possibly ask for… it is a platform that allows a customer to become sort of very intimately familiar with the person or company that is making the thing."
Use your video to connect with your audience. Walk viewers through your prototype’s evolution, from early 3D models to material testing and the final product. Highlight the "why" behind your design choices. For instance, explain how your multi-way divider system prevents club crowding or how your stand mechanism handles uneven terrain. Showcasing these technical aspects builds confidence in your product’s quality.
Take inspiration from designer Rob Hallifax, who documented his Kickstarter process for "the world’s smallest playing cards" in February 2024. His visuals, which included laser alignment marks and pixelated card designs, gave backers an inside look at his creative process. Use similar detailed visuals to emphasize the challenges you’ve tackled.
Before launching, get your prototypes into the hands of trusted golf influencers and journalists. Encourage them to create authentic reviews and unboxing videos by providing unique tracking links and even hosting weekly video hangouts. These efforts can generate buzz and trust among potential backers. Once your visuals are polished, focus on defining reward tiers and realistic delivery timelines to solidify confidence.
Setting Delivery Timelines and Reward Tiers
With a refined prototype in hand, it’s time to translate your product’s quality into clear rewards and achievable delivery timelines. Successful campaigns often include around six reward tiers to keep options simple and guide backers toward the best choices.
Start with a "VIP Special" tier for the first 24 hours, offering a substantial discount. Follow this with an "Early Bird" tier available during the first 48 hours. Your main Kickstarter Special tier can feature a standard discount off the retail price, while a higher-priced "Collaborator" package serves as a price anchor, making other tiers seem more appealing.
Be realistic about production schedules. Promising delivery dates beyond 6 to 12 months can deter backers. Clearly outline a practical timeline in your campaign description and keep backers updated throughout the process.
Consider offering personalization options, like nameplate customization, and include shipping costs for U.S. orders. For international backers, provide clear estimates for shipping and duties. Finally, use simple pricing that ends in 0s or 5s (e.g., $125, $200, $300) to make your tiers stand out and feel easy to understand.
How Golf Bags Are Made? 🏅 Inside a Professional Golf Bag Factory Tour
Conclusion
Turning your golf bag idea into a successful Kickstarter campaign takes careful planning and execution. From developing and testing prototypes to choosing the right manufacturer e creating an engaging pitch, every step matters. Experts suggest going through 3-5 prototype iterations to achieve around 95% manufacturing readiness, ensuring your design can handle practical demands, like supporting up to 50 lbs of golf clubs.
When it comes to production, having a dependable manufacturing partner is key. Campaigns with vetted manufacturers see success rates of 40-50%, compared to the 36% average. For golf accessory projects, quality manufacturing often leads to funding amounts between $50,000 and $300,000. Additionally, working with a manufacturer experienced in Kickstarter projects could help you cut 15-25% of production costs.
As for your campaign pitch, your refined prototype and strong manufacturing process should be front and center. Include high-quality videos that showcase your prototype in action, provide precise dimensions in inches (e.g., 36" x 12" x 10"), and set realistic delivery timelines of 6-12 months. Use clear reward tiers – like $125, $200, and $300 – to guide backers toward their ideal choice.
With your prototype fine-tuned, manufacturing secured, and pitch ready to go, it’s time to launch. Golfers are always on the lookout for better gear that solves real problems on the course. Your preparation in design, production, and presentation sets you up to turn your idea into a funded reality.
FAQs
How do I know my prototype is ready for mass production?
Your prototype is ready for mass production once it has been rigorously tested, fine-tuned, and proven to meet all standards for quality, durability, and functionality.
To confirm readiness, test the prototype under real-world conditions, collect feedback for adjustments, and ensure it can be reliably produced at scale. Work closely with an experienced manufacturer to finalize a production-ready design and guarantee consistent results.
What should I ask a manufacturer before I commit to an order?
When reaching out to a potential manufacturer, it’s important to cover a few key areas to ensure they’re the right fit for your project. Start by asking about their quality control processes – how do they ensure every product meets your standards? Then, dig into their production timelines to see if they can deliver on schedule, especially if you’re working with tight deadlines.
You’ll also want to discuss their minimum order quantities (MOQs) and whether they’re flexible enough to accommodate smaller initial runs. If you have specific design needs, confirm their ability to meet those requirements. Ask if they provide samples before full production and how they handle defects or issues that might arise. It’s always a good sign if they have experience producing similar products.
Don’t forget to talk about lead times, shipping options, and overall costs. Clarify their payment terms and whether they offer options for small batch orders – this is especially important if you’re testing the waters with a new product. Finally, check if they can customize materials or offer personalization features that align with your crowdfunding goals. A manufacturer that can adapt to your vision is a valuable partner.
How do I price reward tiers without losing money on fees and shipping?
To set the right prices for reward tiers, it’s crucial to factor in every cost – manufacturing, shipping, and platform fees. To stay on the safe side, consider adding about 30% to your expense estimates to cover any unforeseen costs and maintain profitability.
When it comes to shipping, offering tiered rates can help. For example, charge lower shipping fees for domestic orders and higher rates for international ones. This approach prevents unexpected losses. Pricing your tiers with enough margin ensures you can handle fees and shipping costs without cutting into your profits.