North American golf trade shows are key events for anyone in the golf industry, offering opportunities to showcase products, connect with buyers, and stay updated on trends. The 2026 PGA Show in Orlando was a highlight, bringing together over 34,000 professionals, 1,195 brands, and nearly $975 million in purchasing power. These events are perfect for launching new products, gaining direct feedback, and building valuable relationships.
Key Takeaways:
- Why Attend: Access to top buyers, networking opportunities, and industry education.
- Major 2026 Event: PGA Show (January 20–23) in Orlando, featuring 1,000+ exhibitors and co-located conferences.
- Preparation Tips: Set clear goals, plan your budget, design an eye-catching booth, and prioritize pre-show outreach.
- Lead Generation: Use digital tools for capturing leads and follow up within 24–48 hours to maximize ROI.
Quick Planning Tips:
- Research trade shows that align with your audience.
- Budget early, allocating funds for booth design, travel, and marketing.
- Engage attendees with hands-on product demos and interactive displays.
- Focus on post-show follow-ups to convert leads into sales.
Trade shows are a powerful way to grow your business, but success depends on thorough preparation and strategic execution.
Research and Planning for Your Trade Show
Selecting the Right Trade Show
Picking the right trade show can make or break your efforts. Start by analyzing attendee demographics to ensure the event aligns with your target audience. For example, if your business specializes in custom golf bags, like Keep Perfect Golf (https://keepperfectgolf.com), you’ll want to focus on shows that attract pro shop operators and high-volume buyers. These events offer the perfect setting to connect with decision-makers who are already interested in your niche.
Some trade shows feature dedicated pavilions tailored to specific industries, which can be a game-changer. The PGA Show, for instance, includes areas like the "Fitness, Health & Wellness Pavilion", "Golf Travel Pavilion", and even a section for racquet sports like pickleball and padel. Exhibiting in one of these focused zones ensures you’re reaching buyers who are genuinely interested in your product category instead of competing for attention in a general exhibit hall.
Co-located events are another excellent way to expand your reach without incurring additional travel costs. The PGA Show, for example, hosts the National Golf Course Owners Association (NGCOA) Golf Business Conference and the AGM Golf Retail Conference alongside the main exhibition. These events attract key decision-makers from private clubs, public courses, and off-course retailers, giving you more opportunities to network and build connections.
Don’t overlook digital tools offered by the trade show itself. Many events provide matchmaking platforms where you can categorize your products and indicate the types of facilities you’re targeting. This helps ensure that buyers know about your booth before the event even starts, maximizing your exposure.
Once you’ve selected the right show, it’s time to set clear goals and develop a solid action plan to make the most of your investment.
Setting Objectives and Creating Your Action Plan
Before you even register for the trade show, define your goals. Are you looking to generate leads, launch a new product, or strengthen your brand’s presence? Use the SMART framework to ensure your objectives are Specific, Measurable, Achievable, Relevant, and Time-Bound. For instance, instead of vaguely aiming to "get more leads", you could set a goal like collecting 100 qualified contacts from pro shop buyers and scheduling 10 follow-up meetings within 30 days of the event.
Budget planning is key, and it’s best to start 9–12 months in advance. A typical budget might allocate:
- 10% for booth space
- 40% for booth design
- 25% for staffing and travel
- 25% for promotional services
If you’re showcasing custom golf bags, don’t forget to include costs for product samples. Also, take advantage of early registration discounts. For example, the PGA Show’s registration fee drops from $199 to $49 for early bird sign-ups.
A timeline with clear deadlines will keep you on track. Most trade shows offer discounted rates for services if you book 15–30 days before the event. To avoid rush fees, aim to finalize your booth design and signage 6–9 months ahead, organize product samples 2–4 months before the show, and kick off pre-show marketing around 8 weeks prior. This proactive approach minimizes stress and ensures a smooth execution.
Researching competitors can also give you a competitive edge. Analyze their past exhibits and conduct a SWOT analysis to identify areas where you can stand out. This step can help you refine your strategy and position your booth to attract more attention.
Finally, invest in pre-show marketing to secure meetings with key buyers. Use email campaigns, social media posts, and landing pages with lead capture forms to drum up interest. Companies that prioritize pre-show outreach often see up to a 400% return on investment, and converting a trade show lead costs about 36% less than relying on cold calls. Starting early ensures your booth stays busy with the right people.
sbb-itb-4fa7e8b
Booth Setup and Marketing Materials
Designing Your Booth for Visibility
Trade shows in North America often use a pipe-and-drape system – metal frames with curtains – rather than the hard-shell booths common in Europe. Since these frames don’t easily support graphics, you’ll need standalone displays or custom frames. Additionally, strict sightline rules mean you can’t use high side walls that block neighboring booths.
When planning your booth, consider your budget and goals. In-line booths, which are open on one side, are the most cost-effective. Peninsula booths, located at aisle ends, open on three sides, while island booths open on all four, offering maximum visibility and foot traffic. Typically, booth space makes up about 35% of your budget, with design, construction, and graphics accounting for another 17%.
Color plays a big role in grabbing attention – studies show that 62% to 90% of a visitor’s first impression comes from color. Use LED backlighting with silicone-edge graphics (SEG displays) to make your booth pop. Place your logo and core messaging at the top of your displays to keep them at eye level and unobstructed.
Don’t overlook flooring. Custom carpet or vinyl with padding not only enhances your booth’s look but also provides comfort for your team during long hours. If you’re showcasing products like custom golf bags – such as cart bags, stand bags, or Sunday bags from Keep Perfect Golf – use spotlights to highlight stitching, material quality, and customization details. Start planning your booth design early to ensure plenty of time for custom graphics and layout approvals. Once your booth design is finalized, shift your focus to marketing materials that reinforce your brand.
Preparing Your Marketing Materials
With your booth’s design in place, equip it with marketing materials that make an immediate impact. Attendees typically decide within 3–5 seconds whether to stop, so your materials need to grab their attention fast. Essentials include high-quality brochures, business cards, and product information sheets. Complement these with hanging signs, retractable banners, and fabric walls that make your brand visible from afar.
"Your booth is a 3D testament to your brand; it should tell your story." – TPG Trade Show & Event Marketing
Digital tools are becoming increasingly important. Tablets or touch-screen kiosks can showcase digital catalogs and interactive demos. For companies offering OEM/ODM services – like Keep Perfect Golf – these tools are excellent for walking buyers through the entire process, from design and sampling to production, inspection, and delivery.
Plan promotional giveaways well in advance – at least four months if you’re sourcing internationally. Branded items like golf accessories, USB drives, or water bottles can keep your company top-of-mind. Replace manual business card collection with digital lead capture tools, such as badge scanners or tablets integrated with your CRM. Lastly, ensure your team is well-prepared to discuss product features and technical details so they can confidently answer questions about manufacturing and customization.
Displaying Product Samples
Nothing beats hands-on experience when it comes to making a sale. In fact, 80% of trade show attendees are more likely to purchase products they’ve interacted with firsthand. Use shelving, counters, and literature racks to display samples professionally.
Lighting can make all the difference. Use spotlights to highlight textures, stitching, and other key product details. Position your most important products at eye level for maximum visibility. If you’re showcasing custom golf bags from Keep Perfect Golf, lighting and strategic placement can emphasize craftsmanship and customization options. Bring multiple samples to showcase different materials, logos, and patterns, giving attendees a clear view of what’s possible.
If space allows, set up a dedicated area for one-on-one conversations and product demonstrations. Make sure this doesn’t overcrowd your main booth. Use multi-level surfaces – like bar-height tables or pedestals – to create visual variety and encourage interaction. Always have spare samples on hand in case of damage or heavy use during the event.
Booth Design Ideas That Win On The Trade Show Floor
Networking and Lead Generation
Once your booth and marketing materials are ready, it’s time to focus on networking and generating leads effectively.
Pre-Show Contact and Meeting Scheduling
Start your outreach about two weeks before the event. Contacting prospects too early might result in them asking you to reconnect closer to the date, while waiting too long risks their schedules filling up. Keep your emails short and tailored – mention shared connections or specific business challenges to make a stronger impression.
Leverage multiple platforms like email, LinkedIn, and X (formerly Twitter) to connect. Also, follow the event’s official hashtag to find attendees discussing their plans. For the PGA Show, ensure your company listing in the Exhibitor Dashboard is up to date with accurate product categories and facility interests. This helps the recommendation engine match you with buyers who are a good fit.
Once a meeting is confirmed, immediately send a calendar invite that includes your booth number, location, and contact information. One exhibitor reported a 60% return rate on pre-scheduled meetings by sending half of a $10 Starbucks gift card before the show and providing the other half only when the prospect visited their booth. At the PGA Show, keep an eye on attendees who "favorite" your company in the mobile app and reach out quickly to schedule a meeting.
These pre-show steps set the stage for meaningful in-person interactions.
Engaging Attendees at the Event
At your booth, prioritize having product experts on hand instead of just sales staff. Train your team to ask open-ended questions and actively listen to attendees. Interactive features, like hands-on product trials or gamified activities, can help draw people in. For instance, companies like Keep Perfect Golf can use tablets to guide buyers through the customization process, from design to delivery, creating a memorable experience.
Digital tools for lead capture, like badge scanners or QR codes, minimize errors and streamline follow-ups. The PGA Show’s Emperia app allows unlimited badge scans and integrates directly into your CRM. Categorize leads as "hot", "warm", or "cold" on the spot to prioritize follow-ups effectively. Research shows that 95% of exhibitors value in-person engagement over virtual alternatives, and attendees are 72% more likely to purchase from exhibitors they meet face-to-face. Before a prospect leaves, clearly outline next steps, such as scheduling a follow-up call or arranging a product demo.
Strong booth engagement is key, but timely follow-up ensures you maintain the momentum.
Following Up and Tracking Leads
Reach out within 24–48 hours to build on your initial conversation. Surprisingly, only 1% to 10% of trade show leads ever receive follow-up, so acting quickly gives you a big edge. Use a three-step email sequence:
- Start with an immediate email featuring a photo of your booth to jog their memory.
- Follow up 48 hours later with a video or webinar invite.
- Send a final email one to two weeks later offering a demo or another meeting opportunity.
"If I only had a dollar for every time I let a prospect leave my booth saying, ‘I’ve got your contact info – I’ll call you after the show!’ These buyers NEVER follow up."
- Jim Cermak, Trade Show Trainer and Coach
For phone follow-ups, leave a voicemail, try again after 10 minutes, and limit your attempts to four calls spaced three business days apart. On LinkedIn, send personalized connection requests referencing your conversation and engage with their recent posts to stay on their radar.
Download your lead data from the retrieval app into your CRM to track each prospect’s journey and measure ROI. Since not all leads are ready to buy immediately, consider automated drip campaigns to nurture them over time. For example, Keep Perfect Golf might share case studies of successful custom golf bag projects or technical guides on material selection and logo customization.
| Lead Capture Method | Pros | Cons |
|---|---|---|
| Badge Scanning Apps | Fast; captures full contact details; integrates with CRM | Can feel impersonal; may lack detailed context |
| QR Codes | Low cost; tracks URL visits and attribution | Relies on attendees to take initiative |
| Business Card Scanners | Quickly digitizes physical cards; allows for immediate notes | Requires card exchange; cards might get lost before scanning |
| Manual Note-Taking | Captures specific details and pain points | Time-consuming; requires later data entry |
Logistics and Budget Management
Trade Show Budget Breakdown: How to Allocate Your Exhibition Costs
Nailing your logistics and budget is crucial for a successful trade show experience. If these areas are poorly planned, you could face surprise expenses, missed deadlines, and unnecessary stress during a critical time for showcasing your business.
Planning Your Trade Show Budget
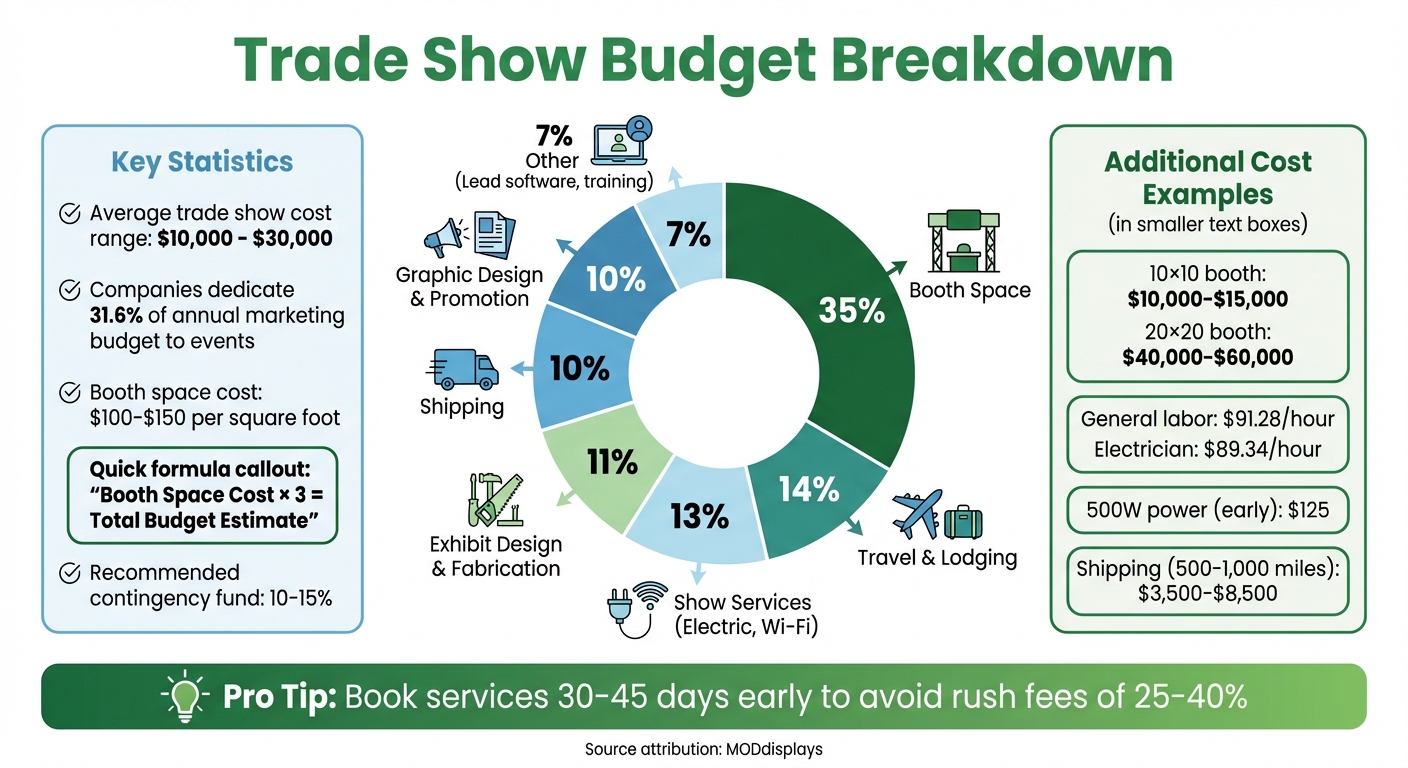
Before committing, decide on your maximum spend. On average, companies dedicate 31.6% of their annual marketing budget to events, with trade show costs typically ranging from $10,000 to $30,000. A useful starting point is the "Ballpark Estimate" formula: take your booth space cost and multiply it by three. This gives you a rough idea of your total expenses.
"The budget for exhibiting at a trade show can vary and depends on your marketing goals. Detail all costs for a clear investment picture." – GES Marketing
Booth space will likely be your biggest expense, often consuming 35% to 60% of your budget. Expect to pay $100–$150 per square foot. For example, a 10×10 booth (100 sq ft) could cost $10,000–$15,000, while a 20×20 booth (400 sq ft) might range from $40,000–$60,000. Custom booth fabrication adds to this, averaging $138–$154.50 per square foot.
Labor costs can also pile up, especially in cities like New York, San Francisco, or Chicago. General display labor runs about $91.28 per hour, electricians cost $89.34 per hour, and riggers average $96.52 per hour. Installation and dismantle (I&D) labor for a moderately complex setup can cost between $3,500 and $10,000. Book utilities like electricity and internet in advance – 500W power ordered early costs around $125, but waiting until the event could double or triple that price.
Shipping is another variable expense. Round-trip freight for 500–1,000 miles typically costs $3,500–$8,500, while cross-country shipments (1,500–3,000 miles) can range from $5,500 to $14,000. To handle unexpected costs like last-minute design tweaks or missing materials, set aside a contingency fund of 10–15%. For travel and lodging, book early through the event’s official housing block to take advantage of group discounts.
Here’s a breakdown of typical trade show budget allocations:
| Expense Category | Percentage of Total Budget |
|---|---|
| Booth Space | 35% |
| Travel & Lodging | 14% |
| Show Services (Electric, Wi‑Fi) | 13% |
| Exhibit Design & Fabrication | 11% |
| Shipping | 10% |
| Graphic Design & Promotion | 10% |
| Other (Lead software, training) | 7% |
Source: MODdisplays
Once your budget is in place, focus on organizing shipping logistics to avoid any last-minute headaches.
Shipping Products and Materials
Shipping logistics can be tricky, but proper planning can save you from unnecessary costs. One key expense to understand is drayage, which covers moving freight from the loading dock to your booth and back. This fee is calculated by weight – usually per 100 lbs (CWT) – and most contractors have a 300-lb minimum charge.
"Drayage (or material handling) is the fee to move it from the loading dock to your booth space and back. Drayage is calculated by weight and can often exceed your shipping costs." – exhibiTeam
The Exhibitor Kit is your roadmap for shipping. Typically sent 60–90 days before the event, it includes critical details like shipping deadlines, labels, and venue rules. Ship materials to the advance warehouse 30–45 days ahead of the event. This ensures your items are ready when your team arrives, reducing stress. Missing this deadline could result in late fees of $30–$40 per CWT.
Consolidate your shipment into as few crates or pallets as possible to cut down on material handling fees and reduce the risk of items getting lost. Use the event-specific labels provided in the Exhibitor Kit on every box and crate, including your booth number, event name, and destination address. Remove old shipping labels to avoid confusion. Companies like Keep Perfect Golf rely on this process to ship custom golf bag samples without hiccups.
Choose carriers with trade show experience. These carriers are familiar with marshaling yards and can help you avoid detention fees caused by long wait times at loading docks. At large events, where millions of pounds of materials are coordinated, strict move-in schedules are enforced. On the final day, complete the Material Handling Agreement (MHA) to direct contractors on where to send your booth next.
Team Coordination and Staffing
With logistics squared away, focus on preparing your team to execute efficiently. Start planning staffing needs 9–12 months before the event. Choose team members with strong people skills – if your main lead isn’t naturally outgoing, pair them with someone who is. Train your team thoroughly so they can confidently answer attendee questions.
Hold team meetings 3–6 months prior to the event to align on business goals and KPIs. Set a clear per diem for meals and entertainment to keep travel expenses predictable. Assign one team member to oversee booth setup, dismantling, and outbound shipping. This supervision usually accounts for 25% to 45% of your I&D labor budget.
When scheduling installation labor, plan for it to begin the day after your freight is expected to arrive. This avoids paying workers to wait for undelivered materials. Check the event manual to see if your team can handle basic tasks like unboxing brochures or setting up simple displays. Doing so can help you save on union labor costs. Pack an emergency kit with essentials like first aid supplies, tools (screwdrivers, tape), cleaning items, and tech gear like power banks and extension cords.
Encourage your team to arrive early and stay late to network with other vendors and industry peers. These connections can be just as valuable as meeting potential leads. To maintain a professional image, have your team wear branded apparel or follow a specific dress code throughout the event.
Conclusion: Maximizing Your Trade Show Results
Achieving success at trade shows begins well in advance – ideally 6 to 12 months before the event. Early preparation not only ensures you secure prime booth locations but can also save you 25–40% on rush fees. With the right approach, exhibitors have the potential to see up to a 400% return on investment (ROI).
To make the most of your trade show experience, focus on five key areas. Start by setting SMART goals – specific, measurable, achievable, relevant, and time-bound. For example, aim to generate 150 qualified leads or schedule 25 product demos. Next, design a booth that grabs attention with graphics visible from over 20 feet away. Pair this with a multi-channel promotion campaign to schedule meetings before the event. Train your staff to confidently engage with attendees, and implement a follow-up system to nurture leads after the show. Despite the opportunities trade shows offer, only 6% of exhibitors report being highly confident in their ability to convert leads.
"What we particularly love about the PGA Show is we get to meet our customers here who value high quality products and the very best available in the industry." – T.B. Phelps
At high-profile events like the PGA Show, where more than 1,000 vendors compete for attention, standing out is crucial. Attendees are drawn to innovative, high-quality offerings that showcase leadership in the industry. A company like Keep Perfect Golf exemplifies this by providing comprehensive OEM/ODM golf bag solutions, from design to delivery. Their customization options, including logo placement, material choices, and pattern designs, allow exhibitors to create displays that not only attract attention but also establish credibility in a crowded marketplace. This highlights the importance of a dynamic booth and proactive attendee engagement.
After the event, evaluate your success by tracking metrics like cost per lead, conversion rates, and booth interaction time. Keep monitoring your sales pipeline for 6 to 24 months, as B2B sales cycles in industries like golf equipment can be lengthy. With thorough preparation, effective follow-up, and standout displays, your trade show investment can yield results far beyond other marketing efforts.
Preguntas frecuentes
How do I choose the right golf trade show for my buyers?
To find the best golf trade show for your needs, zero in on events that draw the audience you want to reach – think industry experts and decision-makers. Look into the show’s reputation, the type of attendees it attracts, and the networking opportunities it offers. A standout example is the PGA Show in Orlando, which is known for connecting brands with dedicated buyers. Also, weigh factors like the event’s location, timing, and the support it provides to exhibitors to make sure it aligns with your objectives and delivers the most value for your investment.
What should I do in the first 48 hours after the show ends?
After a trade show wraps up, the first 48 hours are crucial. Use this time to reconnect with leads and evaluate how things went. Start by reviewing all the leads you gathered and promptly responding to them. Sending personalized thank-you emails to visitors who engaged with your booth can leave a lasting impression.
Don’t forget to check the condition of your booth and confirm the logistics for either returning or storing your materials. Additionally, take a close look at event reports to measure how successful your efforts were. These steps not only help you get the most out of your investment but also set you up for smoother planning in the future.
How can I cut booth and shipping costs without looking cheap?
You can cut down on booth and shipping costs while maintaining a polished look by opting for lightweight, modular, or rental displays. Planning ahead is key – this helps you sidestep costly last-minute expenses. Additionally, choosing the right booth placement can boost visibility, even with a smaller setup. With thoughtful preparation, you can achieve a professional presence without overspending.